

Stretching Your Limits: Mastering Resistance Bands for Optimal Strength Building
By: Sophie Jouliardt Published: 26 Sept 2023
In the world of fitness, building strength is a powerful journey. And if you’re looking for a versatile and effective way to boost your strength, look no further than resistance bands. These stretchy wonders can help you stretch your limits, no matter your fitness level. In this article, we’ll dive deep into the world of mastering resistance bands for optimal strength building. We’ll cover everything from understanding these bands to choosing the right one, and we’ll even share some fantastic exercises and tips to maximise your gains. So, get ready to flex those muscles and unleash your inner strength!
Understanding Resistance Bands
Resistance bands, often called stretchy superheroes, are the unsung heroes of strength training. These bands are simple yet effective tools that offer resistance in various forms—loop bands, tube bands, flat bands—suitable for all fitness buffs. They work by challenging your muscles during exercise, making each move count.
Resistance bands come in a trio of tantalising types, each with its own unique perks. First up, we have loop bands, which are perfect for lower-body workouts, such as squats and leg lifts. Then, tube bands, equipped with handles, provide versatility for full-body exercises and are fantastic for targeting specific muscles. Last but not least, flat bands offer a wide range of motion for both upper and lower-body workouts, adding a twist to your routine. What’s even more exciting is their affordability and portability—these bands are the perfect compact home gym equipment, giving you no excuse to miss a workout.
Choosing the Right Resistance Bands
Selecting the perfect resistance band is like finding the right key to unlock your strength potential. It all begins with understanding your fitness level and goals. If you’re new to resistance training, start with lighter bands and gradually move up. For seasoned pros, higher resistance bands will provide the challenge you crave. But there’s more to it than just resistance level. Consider the material, durability, and your intended use. A high-quality band ensures longevity and safety. So, choose wisely to match your needs, and you’ll have the perfect fitness companion to accompany you on your journey to mastering resistance bands for optimal strength building. Here are some of the products we recommend for your home workout equipment:
Warm-Up and Safety Precautions
Before diving into the thrilling world of resistance band exercises, it’s essential to lay the foundation with a proper warm-up. A brief warm-up routine gets your muscles ready for action and reduces the risk of injury. Start with dynamic stretches and light cardio to increase blood flow. Safety is paramount when working with resistance bands. Maintain proper form, anchor the bands securely, and position your body correctly to prevent accidents. Always inspect your bands for wear and tear to avoid unexpected snaps. By prioritising warm-ups and safety precautions, you’ll create a safe and effective space for your strength-building journey with resistance bands.
Essential Resistance Band Exercises
Videos for this article were taken from Women’sHealth.
For a well-rounded and efficient workout, you’ll want to choose four to five exercises from the list below. Give each exercise your all for 45 seconds, then take a quick 15-second breather. Once you’ve powered through one round of these selected exercises, feel free to take a more extended rest if needed or jump right into the next round. The goal is to complete a total of four rounds, but if you’re up for an extra challenge, consider doubling that for two sets of four rounds. This workout routine promises to keep you engaged and working toward your fitness goals!
1. Banded Front Squat
-
- Stand in the middle of the resistance band with feet hip-width apart, holding one end of the band in both hands.
-
- Bend arms to bring hands up next to ears, and lift elbows up until triceps are parallel to the floor and narrow. This is your starting position.
-
- Keeping arms still, engage core and bend at knees to sink hips back and down until thighs are parallel to floor.
- Press through feet to extend legs and return to standing. That’s one rep.
2. Lateral Walk
-
- Wrap a resistance band around thighs, and slowly sink the seat into a half-squat position.
-
- Lift right foot and take one step to the right, followed by the left foot.
- Then, reverse the movement to return to the starting position. That’s one rep.
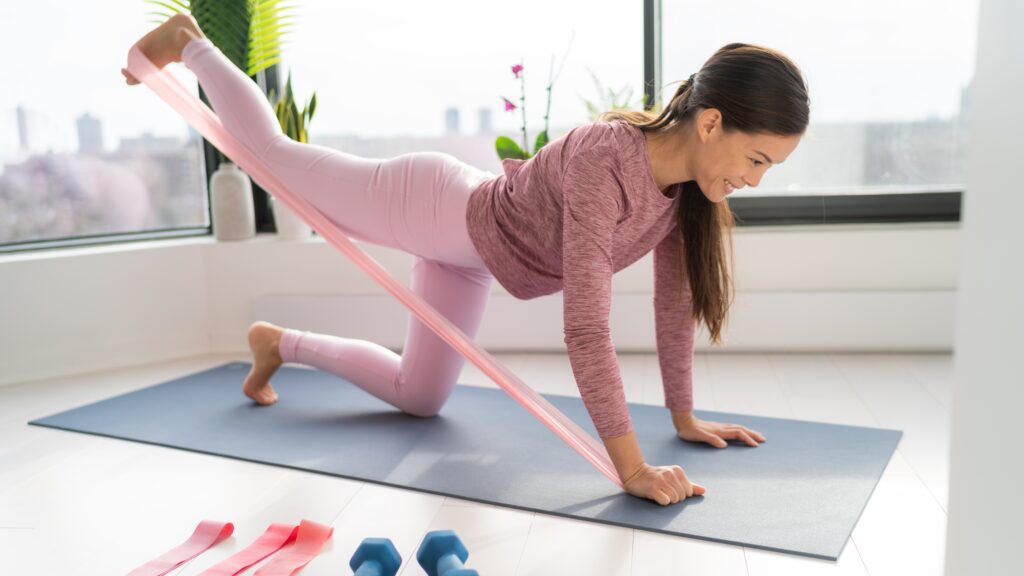
3. Kickstand Single-Leg Romanian Deadlift
-
- Start standing with feet staggered, right foot forward, left foot back resting on the ball of your foot. Put one part of the band around the right foot, and the other part in the left hand.
-
- Hinge forward while pushing hips back, keeping back straight, then return to starting position, keeping tension on the band the entire time. That’s one rep.
Complete 30 to 45 seconds of reps on one side then switch to the other before heading to your next move.
4. Abduction
- Wrap a resistance band around thighs.
- Lower down into a half-squat position.
- Without moving your feet, press your right knee a few inches out to the right. Return to start.
- Repeat on the left side. That’s one rep.
5. Side Plank High Pull
- Start in a side plank with the band under your left hand on the floor, the other end in your right hand.
- Stay in plank as you pull the band up with your right hand, leading with your elbow.
- Return to start. That’s one rep.
Complete 30 to 45 seconds of reps on one side then switch to the other before heading to your next move.
6. Lateral Raise
- To start, stand with knees slightly bent, feet staggered, right foot forward and flat on the floor, left back (heel high), with the middle of a resistance band looped underneath the arch of right foot, hands grasping it by the ends, and arms at sides.
- Raise arms outward to the sides until parallel to the floor. Return slowly to start. That’s one rep.
7. Deadlift
- Start standing with feet hip-distance apart and a resistance band wrapped around arches.
- Grab the top of the band with both hands, arms straight, and press hips backward into a hinge position.
- Drive down through heels to stand up straight, squeezing glutes at the top. That’s one rep.
8. Banded Glute Bridge with Hip Abduction
How to: Wrap a resistance band around your thighs and lie on your back with knees bend and feet flat on the floor and arms pressing into the mat. This is your starting position. Brace core, then press into heels and squeeze glutes to raise hips towards the ceiling. Pause, then press knees out wide. Return to start. That’s one rep.
9. Standing Banded Triceps Extension
- To start, stand with knees slightly bent, feet staggered, right foot forward and flat on the floor, left back (heel high), with the middle of a resistance band looped underneath the arch of right foot, hands grasping it by the ends, and arms extended straight up overhead, palms facing each other.
- Keep upper arms still, bend at elbows, and lower hands to just behind your head.
- Reverse movement to return to start. That’s one rep.
10. Plank Row
- Start in a high plank position with one end of a resistance band looped around the left palm and the other held by the right hand, which is slightly elevated to create tension.
- Keep core engaged and hips stable, then pull right elbow back toward right hip. Slowly lower back down. That’s one rep.
Complete 30 to 45 seconds of reps on one side then switch to the other before heading to your next move.
Common Mistakes to Avoid
In the realm of resistance bands, a few common mistakes can hinder your progress. Firstly, neglecting proper form can lead to ineffective workouts and potential injuries. Ensure your body alignment is spot-on for each exercise. Overstretching your bands can cause them to snap, so avoid excessive tension. Another pitfall is rushing through reps; slow, controlled movements yield better results. Neglecting variety is a mistake too; diversify your exercises to target all muscle groups. Lastly, consistency is key. Skipping workouts will slow your progress. By steering clear of these blunders, you’ll pave the way for a successful strength-building journey with resistance bands.
Conclusion
In the world of fitness, mastering resistance bands has the potential to be a game-changer. These simple yet versatile tools can transform your strength-building journey, offering a cost-effective and convenient way to reach your fitness goals. From understanding the types and selecting the right bands to embracing warm-up routines and avoiding common pitfalls, you now possess the knowledge to embark on a powerful path to optimal strength. So, don’t wait – grab your resistance bands, follow the tips shared here, and unleash your inner strength. Consistency and dedication will be your allies on this exciting journey toward a stronger, healthier you. Get ready to stretch your limits and rise to new heights!
Make sure to also check out our other articles on Strength!